INTRODUCTION
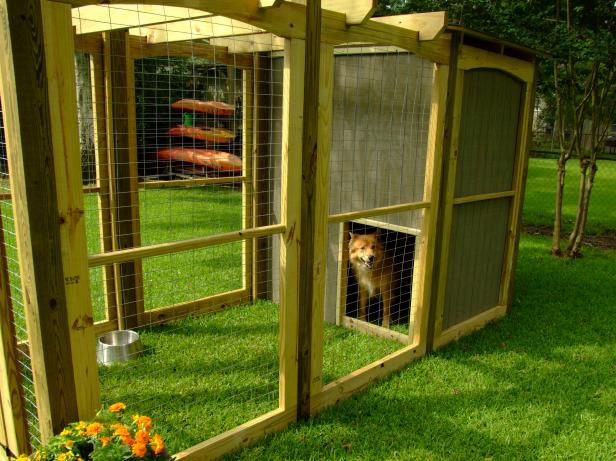
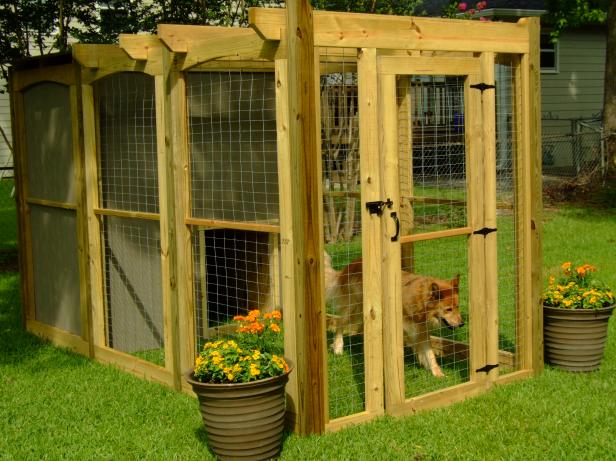
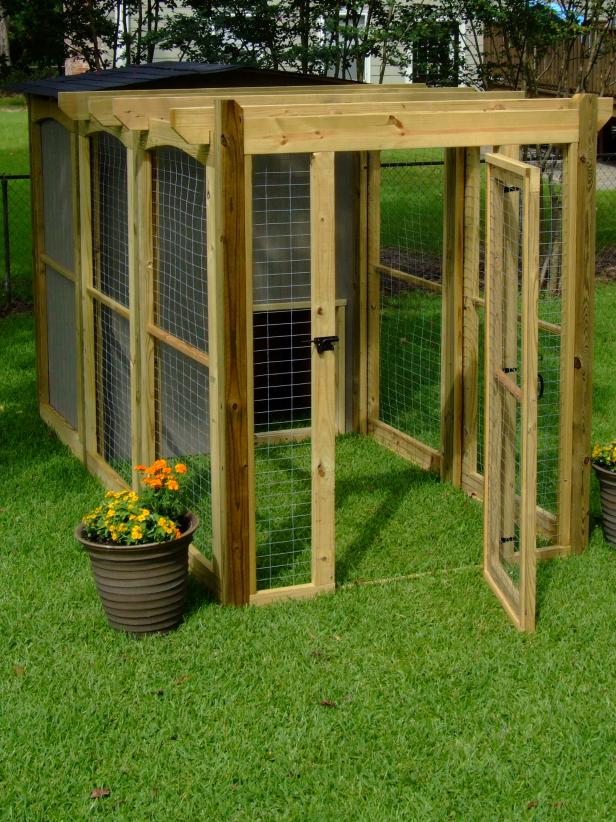
The front of this dog run offers a pergola design that is both attractive and functional, providing some element of shade. The wire fencing is sturdy, yet it creates a more desirable appearance than ordinary chainlink fencing.
This project uses treated lumber, which helps keep the cost down. Using a naturally resistant lumber, such as cedar or redwood, will offer a different appearance, but doing so will cost significantly more.
Much of the assembly is completed using pocket-hole joinery. If you are unfamiliar with this method of joinery, check out these guidelines.
Be sure to select a flat area of your yard that does not have drainage issues and, if possible, an area that will be shaded during some part of the day.
Finished dimensions:
67" wide x 142-3/4" deep x 86" tall
67" wide x 142-3/4" deep x 86" tall
STEP 1
Cut List
Parts List:
back/side stiles (14) – 1 1/2 x 3 1/2 x 67
side top rails (6) – 1 1/2 x 5 1/2 x 42 3/4
side bottom rails (6) – 1 1/2 x 5 1/2 x 42 3/4
side center rails (6) – 1 1/2 x 1 1/2 x 35 3/4
back rails (2) – 1 1/2 x 5 1/2 x 60
back center rail (1) – 1 1/2 x 1 1/2 x 53
front bottom rails (2) – 1 1/2 x 3 1/2 x 15
front narrow stiles (2) – 1 1/2 x 1 1/2 x 71
front wide stiles (2) – 1 1/2 x 3 1/2 x 71
front top rail (1) – 1 1/2 x 5 1/2 x 60
front top trim (1) – 1 1/2 x 1 1/2 x 60
front bottom trim (2) – 3/4 x 1 1/2 x 15
front vertical trim (4) – 1 1/2 x 1 1/2 x 77
front door stop (1) – 1 1/2 x 1 1/2 x 60
door center rail (1) – 1 1/2 x 1 1/2 x 21
door stiles (2) – 1 1/2 x 3 1/2 x 65 1/2
door rails (2) – 1 1/2 x 3 1/2 x 28
door horizontal trim (2) – 3/4 x 1 1/2 x 28
door vertical trim (2) – 3/4 x 1 1/2 x 69 1/2
side posts (6) – 3 1/2 x 3 1/2 x 80
side vertical trim (8) – 1 1/2 x 1 1/2 x 78
side horizontal trim (4) – 3/4 x 1 1/2 x 39 3/4
front posts (2) – 3 1/2 x 3 1/2 x 83
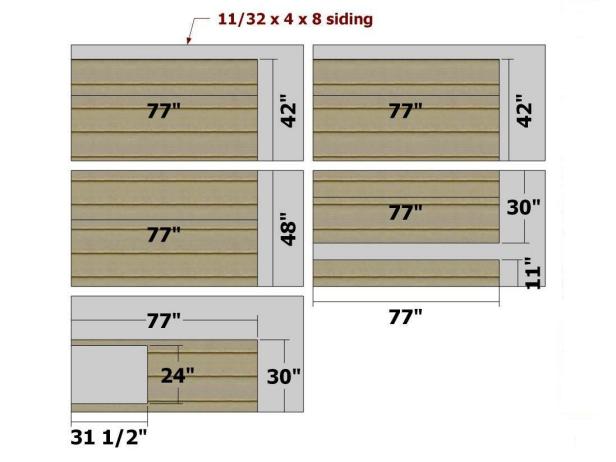
wide back siding panel (1) – 11/32 x 48 x 77
narrow back siding panel (1) – 11/32 x 11 x 77
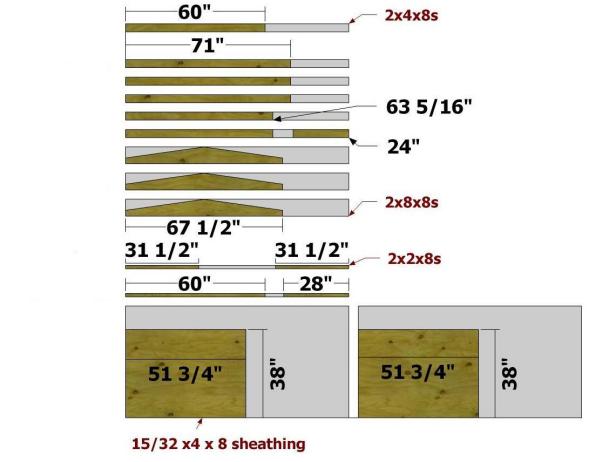
filler strip (1) – 1 1/2 x 3 1/2 x 60
roof rafters (3) – 1 1/2 x 7 1/4 x 67 1/2
side siding panels (2) – 11/32 x 42 x 77
house frame rails (2) – 1 1/2 x 3 1/2 x 63 5/16
house frame stiles (3) – 1 1/2 x 3 1/2 x 71
house door rail (1) – 1 1/2 x 3 1/2 x 24
front siding panels (2) – 11/32 x 30 x 77
front siding trim (1) – 3/4 x 1 1/2 x 60
house door side trim (2) – 3/4 x 1 1/2 x 31 1/2
house door top trim (1) – 3/4 x 1 1/2 x 28
roof sheathing (2) – 15/32 x 38 x 51 3/4
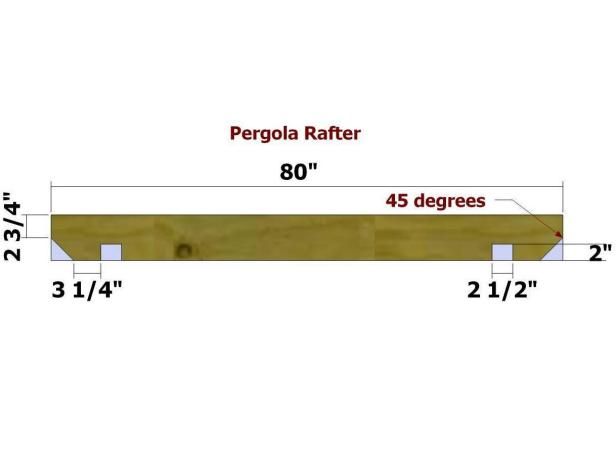
pergola rafters (4) – 1 1/2 x 5 1/2 x 80
STEP 2
Measure, Mark, Cut and Drill Pocket Holes
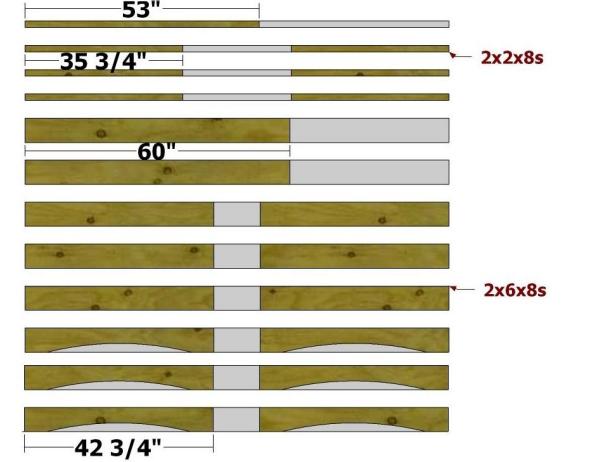
Use the cut lists as a guide for the parts in this section of the instructions (Images 1 and 2).
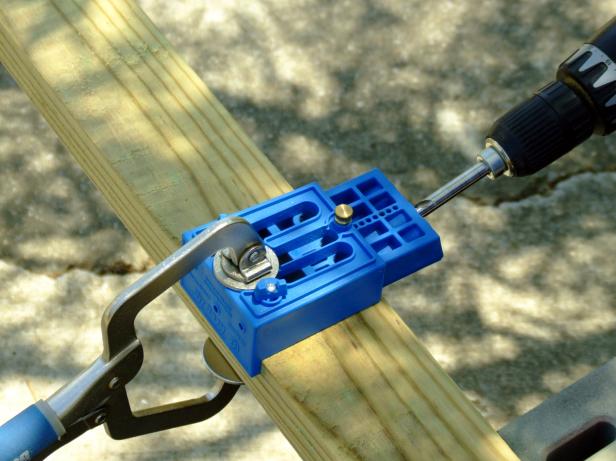
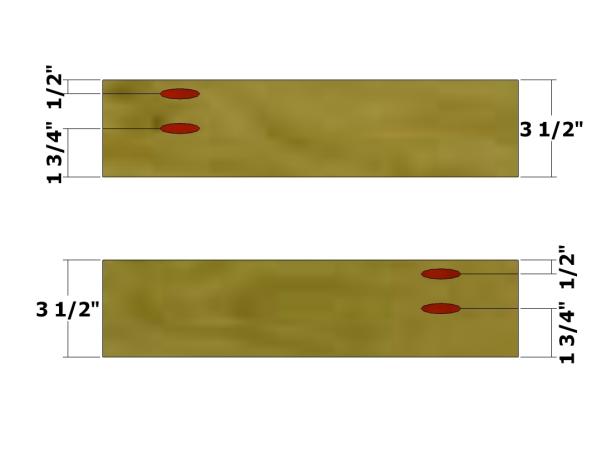
Cut the Back/Side Stiles to length and drill pocket holes on the ends and sides as shown (Images 3 and 4).
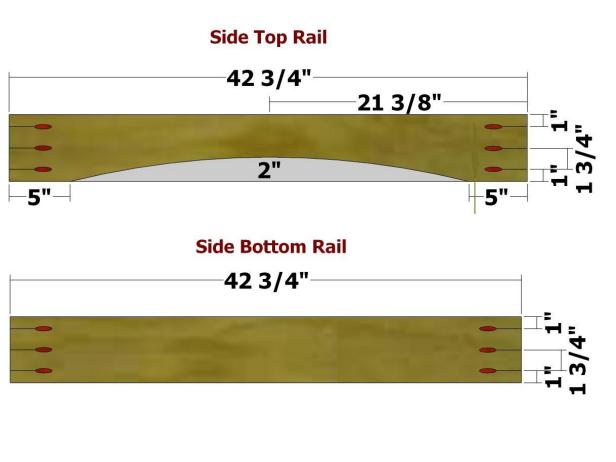
Use the layout below as a guide for measuring, marking, cutting and drilling pocket holes in the side-top rails and side bottom rails. Be sure to set the pocket-hole jig and drill bit for 1-1/2-inch stock (Image 5).
STEP 3
Build the Panels
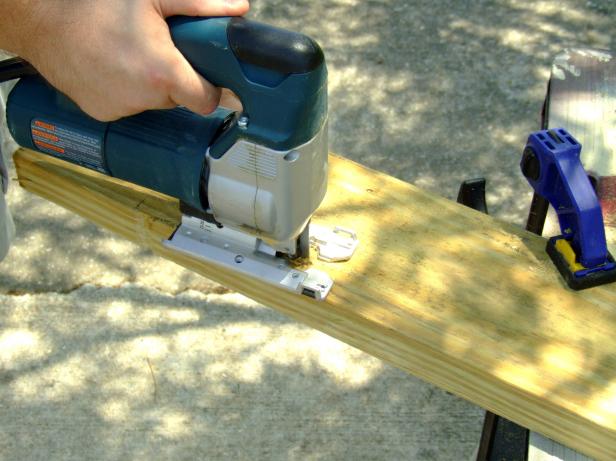
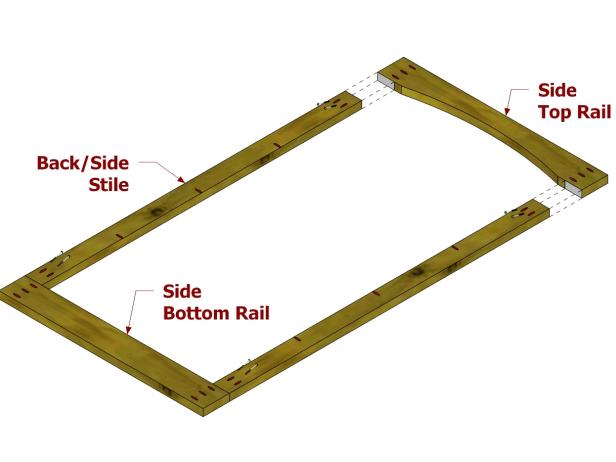
Use a thin strip of scrap wood as a guide for marking the arc on the Side-Top Rails. Use a jigsaw to cut the arc (Image 1).
Position the Back/Side Stiles flush with the ends of the Side-Top Rails and Side Bottom Rails, and attach using glue and 2-1/2-inch pocket-hole screws (Image 2).
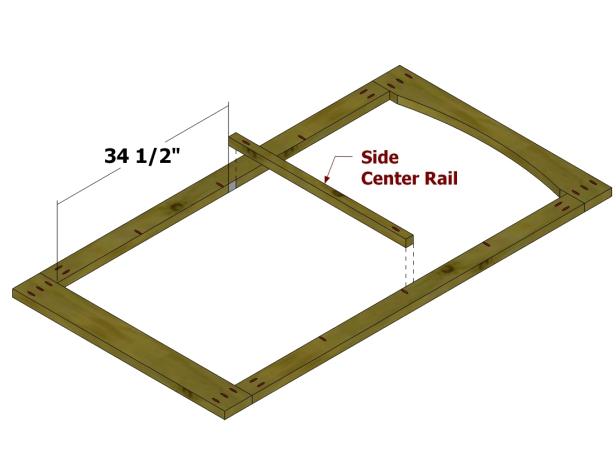
Cut the Side-Center Rails per the cut list and drill one pocket hole on each end. Check the thickness of the Side-Center Rails and adjust the pocket-hole jig as needed.
Position the Side-Center Rails as shown (34 1/2 inches from the bottom end), and attach using glue and 2-1/2-inch pocket hole screws.
Note: You will create six Side Panel Assemblies (Images 3 and 4).
STEP 4
Wrap in Wire Fencing
On four of the six Side-Panel Assemblies, position the 48-inch-wide wire fencing centered across the width of the side panels and roughly 1/2 inch from the top end. Attach to the side panels using 3/4-inch poultry netting staples. Trim the fencing at the bottom end using wire cutters.
STEP 5
Create the Back Rails
Cut the Back Rails per the cut list and drill three pocket holes on each end.
Position the Back/Side Rails in the same manner as before (flush with the ends of the back rails) and attach using glue and 2-1/2-inch pocket-hole screws.
Cut the back-center rail per the cut list and drill one pocket hole on each end.
Position the back-center rail 34 1/2 inches from the bottom end and attach using glue and 2-1/2-inch pocket-hole screws.
Note: DO NOT attach wire fencing to the back panel assembly or two of the side panel assemblies.
STEP 6
Create the Doorway
Use the cutting diagram as a guide for the parts in making the door (Image 1).
Use the layouts as a guide for drilling pocket holes in the front-bottom rails. Drill two pocket holes on each end of the Front-Narrow Stiles and Front-Wide Stiles. Drill three pocket holes on each end of the front top rail. (Image 2)
Position the Front-Bottom Rails, Front-Top Rail, Front-Narrow Stiles and Front-Wide Stiles, then assemble using glue and 2-1/2-inch pocket-hole screws (Image 3).
Cut two sections of wire fencing measuring 14-1/2 x 79-1/2. Position each section centered over the Front-Narrow Stiles and Front-Wide Stile and attach using poultry netting staples.
Position the Front-Top Trim and Front-Bottom Trim, and attach using 2-1/2-inch screws. Drill countersunk pilot holes for the screws.
Note: You will be temporarily removing the front-top trim in a later step, so do not worry about covering up the top pocket hole. (Image 4)
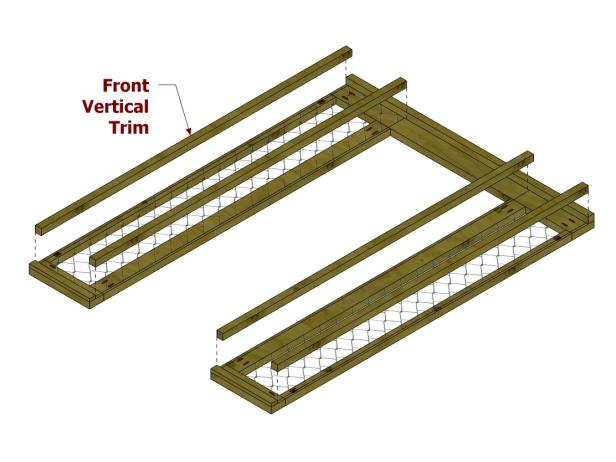
Position the Front-Vertical Trim (for parts total) and attach using 2-1/2-inch screws. Drill countersunk pilot holes for the screws (Image 5).
Position the Door Stop, then attach using 2-1/2-inch screws. Drill countersunk pilot holes for the screws (Image 6).
Drill two pocket holes on each end of the Door Center Rail and the Door Stiles.
Position the Door Center Rail, then attach using glue and 2-1/2-inch pocket hole screws. Position this assembly with the Door Stiles flush with the ends of the Door Rails and attach using glue and 2-1/2-inch pocket-hole screws (Image 7).
Cut a section of wire fencing 27-1/2 x 72. Position the fencing centered over the door assembly and attach using poultry netting staples.
Position the Door Horizontal Trim then attach using 1-5/8-inch screws. Drill countersunk pilot holes for the screws (Image 8).
Position the Door Vertical Trim, then attach using 1-5/8-inch screws. Drill countersunk pilot holes for the screws (Image 9).
Test fit the Door Assembly in the Front Assembly.
Check the tightness of the screws attaching the door trim and tighten if needed (Image 10 and 11).
STEP 7
Assemble the Back
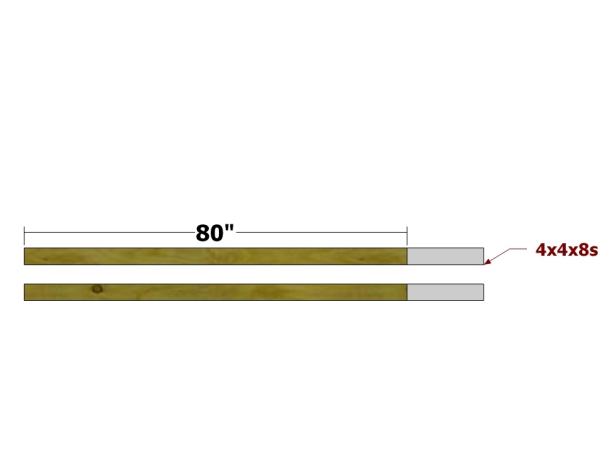
Use the cutting diagram as a guide for the parts in this section of the instructions (Image 1).
Position the Side Posts flush with the bottom end of the Back Panel Assembly (making sure the face of the assembly without pocket holes is down and flush with the edge of the Side Posts), and attach using 2-1/2-inch pocket-hole screws. Make sure you drive screws through all the pocket holes on the rails and stiles (Image 2).
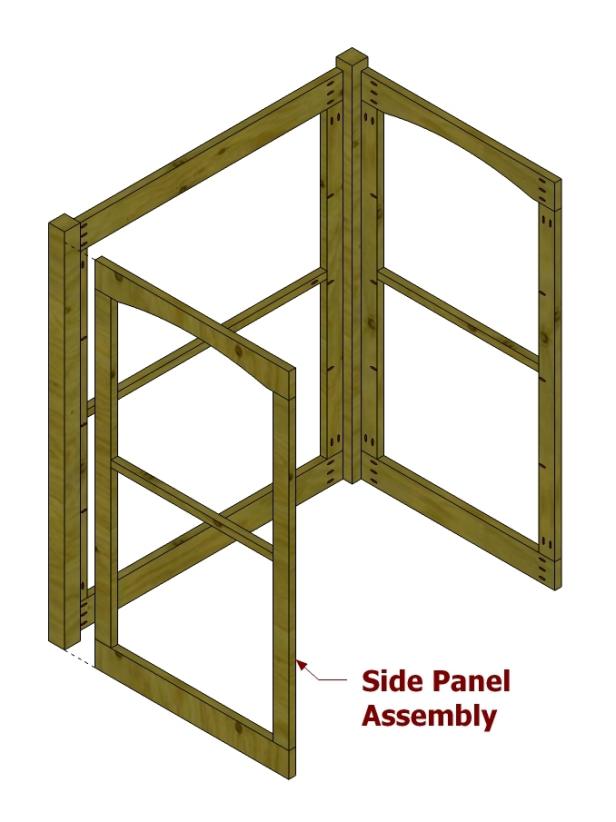
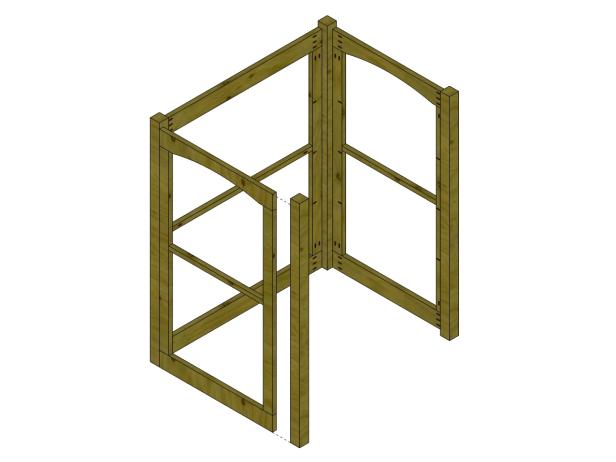
Place the assembly with the pocket holes facing up. Using a helper, position the bottom end of one of the Side Panel Assemblies without wire fencing flush with the bottom and outside edge of a Side Post attached to the Back Panel Assembly, and attach using 2-1/2-inch pocket hole screws (Image 3).
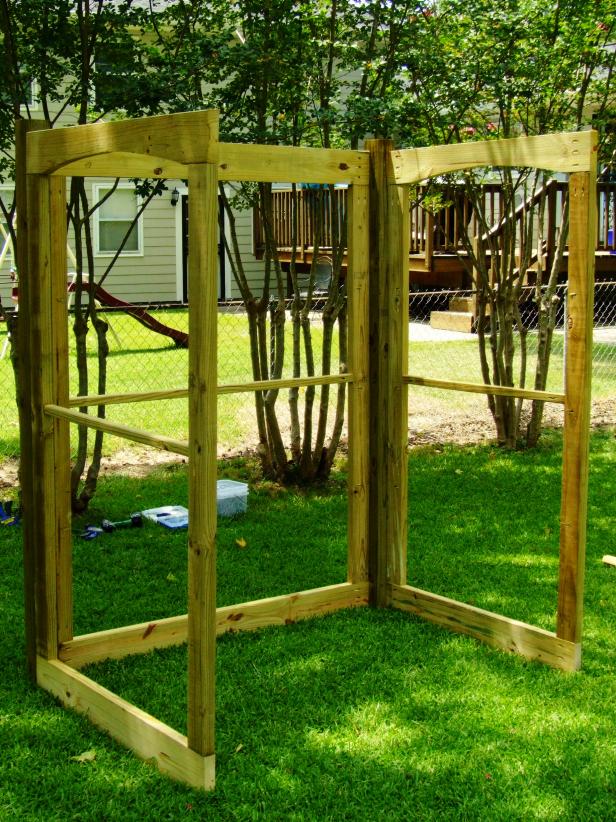
Stand the assembly up, position the other Side Panel Assembly without wire fencing flush with the bottom end and outside edge of the Side Post, and attach using 2-1/2-inch pocket-hole screws (Images 4 and 5).
STEP 8
Begin Attaching the Sides
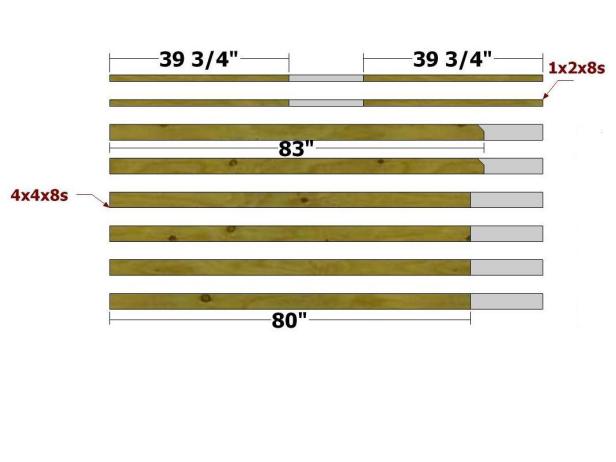
Use the cutting diagrams as a guide for the parts in this section of the instructions (Images 1 and 2).
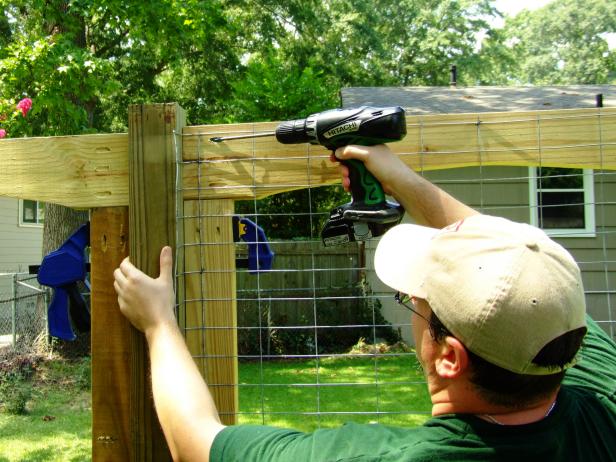
Position two Side Posts, then attach using 2-1/2-inch pocket-hole screws (Images 3 and 4).
STEP 9
Finish Attaching the Sides
Use a pair of pliers to crimp and fold the wire fencing extending beyond the width of the Side Panel Assemblies with wire fencing.
Position two of these assemblies flush with the bottom end and outside edge of the Side Posts and attach using 2-1/2-inch pocket-hole screws (Image 1).
Position the Side Vertical Trim to cover the ends of the wire fencing.
Note: You may need to cut off the excess with wire cutters. Attach the Side Vertical Trim to the Side Posts using 2-1/2-inch screws. Drill countersunk pilot holes for the screws (Images 2 and 3).
Position the Side Horizontal Trim flush with the bottom of the Side Panel Assembly, and attach using 1-5/8-inch screws. Drill countersunk pilot holes for the screws (Image 4).
Attach Side Posts to the other end of these Side Panel Assemblies, followed by the final two Side Panel Assemblies.
Cut the Front Posts to length per the Parts List, then a 45-degree miter on one end measured at 1-1/2-inches.
Position the non-mitered end of the Front Posts flush with the bottom end and outside edge of the last two Side Panel Assemblies and attach using 2-1/2-inch pocket hole screws (Image 5).
Attach the final Side Vertical Trim and Side Horizontal Trim parts (Images 6-8).
STEP 10
Attach the Front
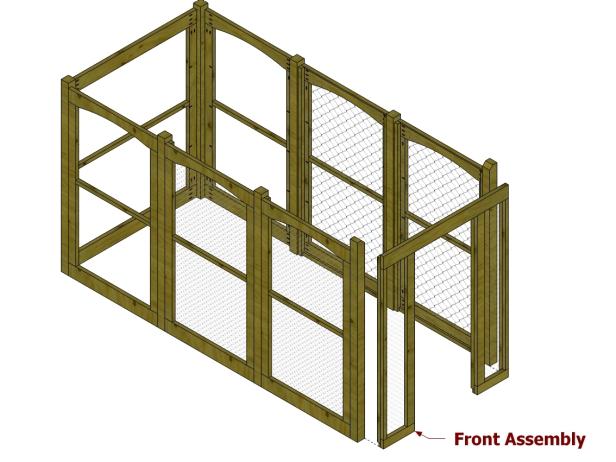
Remove the Front Top Trim and Door Stop from the Front Assembly.
Position the Front Assembly flush with the bottom end and outside edges of the Front Posts (Image 1).
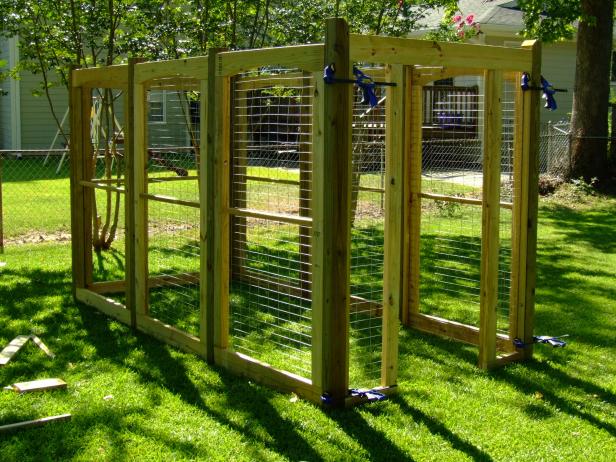
Clamp the assembly in place (Images 2 and 3).
Attach the assembly to the Front Posts using 2-1/2-inch pocket-hole screws. Also attach the Narrow Front Stiles to the Front Posts using 2-1/2-inch screws. Drill countersunk pilot holes for the screws (Image 4).
Re-attach the Front Top Trim and Door Stop. Position the Door Assembly centered within the opening of the Front Assembly, roughly 1 inch from each side and the top and bottom. Use shims and a helper to assist (Image 5).
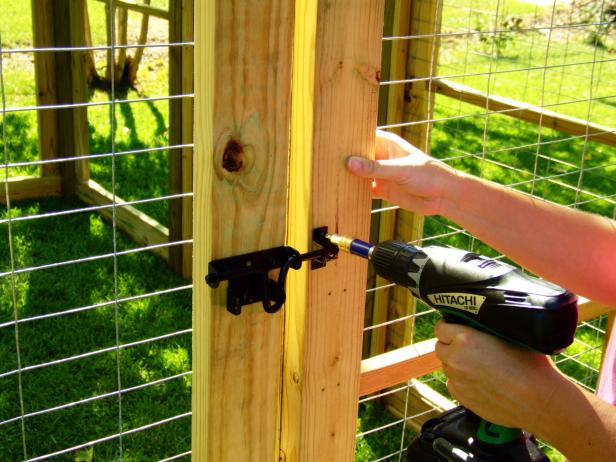
Attach the Door Assembly to the Front Assembly using 4-inch strap hinges (Image 6). Attach a slide action gate bolt to the Front Assembly and Door Assembly. Finally, attach a door pull to the Door Assembly
STEP 11
Build the House
Use the cutting diagram as a guide for the parts in this section of the instructions (Images 1 and 2).
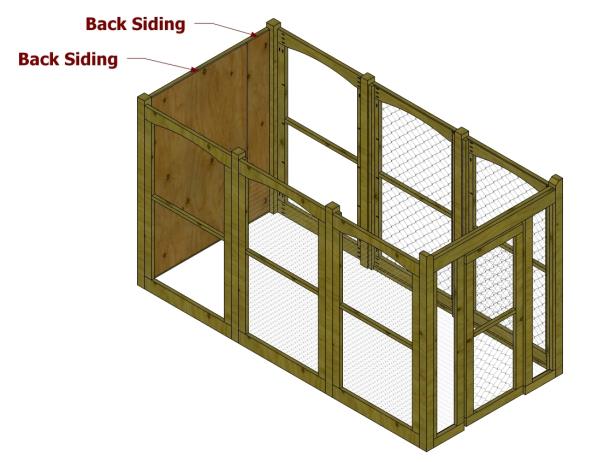
Measure the width of the inside of the Back Panel Assembly and cut two pieces of Back Siding to fit this dimension. Use the measurements for the Wide Back Siding Panel and Narrow Back Siding Panel as guides only. The siding has an overlap and underlap edge, so you will need to account for this in your measurements. Paint the siding and allow it to dry prior to assembly.
Position the back siding panels flush with the top of the Back Panel Assembly and attach using 1-5/8-inch screws. Be sure to attach to the Back Rails, Back Center Rail and Back/Side Stiles. Drill countersunk pilot holes for the screws (Image 3).
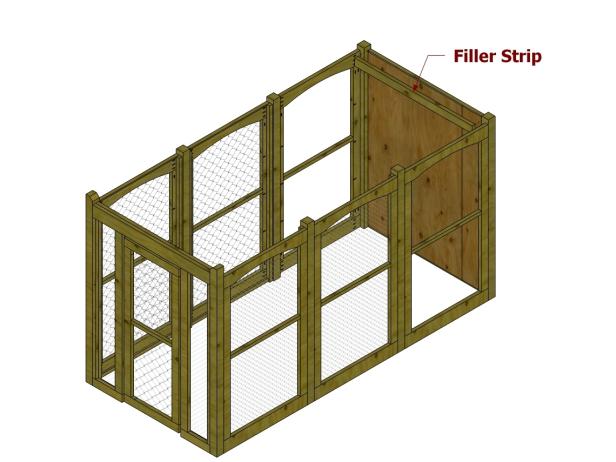
Position the Filler Strip flush 3/4 inch from the top of the Side Posts, as shown in Image 3, and attach to the back siding panels and top Back Rail using 2-1/2-inch screws. Drill countersunk pilot holes for the screws (Image 4).
Cut the Roof Rafters. Paint the outer faces of the front and back Roof Rafters and allow to dry prior to installation.
Position the Roof Rafters, then attach them to the Side Top Rails using 3-inch screws. Drill countersunk pilot holes for the screws (Image 5).
Measure the width of the inside of the Side Panel Assemblies and cut the Side Siding Panels to fit this dimension. Paint the siding and allow it to dry prior to assembly. Attach to the Side Top Rails, Side Center Rails and Back/Side Stiles using 1-5/8-inch screws. Drill countersunk pilot holes for the screws (Image 6).
Cut the House Frame Rails, House Frame Stiles and House Door Rail per the Parts List. Drill two pocket holes on both ends of the House Frame Stiles and House Door Rail.
Position the House Frame Rails, House Frame Stiles and House Door Rail as shown in Image 9 and attach the parts using 2-1/2-inch pocket-hole screws (Image 7).
Position this assembly with the pocket holes facing toward the back siding panels. Make sure the House Frame Rail furthest away from the House Door Rail is at top.
Position this top House Frame Rail so that it flush with the front Roof Rafter. Make sure the outer House Frame Stiles are flush with the outside edge of the Side Posts. Attach the top and bottom House Frame Rails to the Side Posts using 3-inch screws. Drill countersunk pilot holes for the screws.
Measure the width of the inside of the front face of the House Frame Assembly and cut the Front Siding Panels to fit this dimension. Make sure that the two panels meet and overlap near the middle of the center House Frame Stile. Paint the siding and allow it to dry prior to assembly.
Attach one panel over of the door opening with just a few screws. Make sure it is flush with the Side Post and top edge of the top House Frame Rail. Step inside the house area and mark the door opening on the back side of the Front Siding Panel. Remove this panel and cut the door opening using a jigsaw.
Re-attach this Front Siding Panel, then attach the other Front Siding Panel using 1-5/8-inch screws (Image 8).
STEP 12
Add Trim and Roofing
Position the Front Siding Trim flush with the top edge of the Front Siding Panels and attach to the front Roof Rafter using 1-5/8-inch screws.
Position the House Door Side Trim flush with the outside edge of the door opening, and the House Door Top Trim centered across and flush against the ends of the side trim. Attach using 1-5/8-inch screws (Image 1).
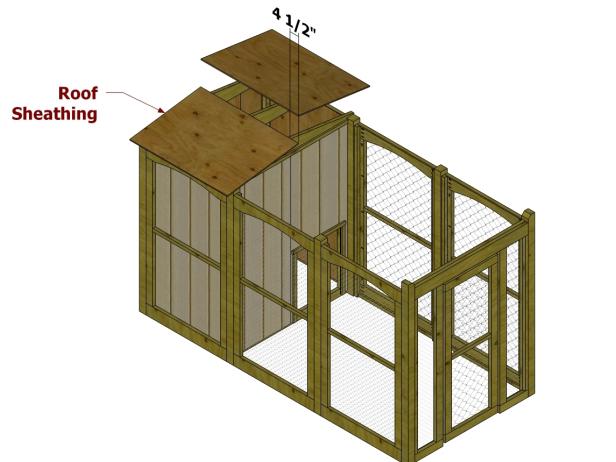
Position the Roof Sheathing so the edges meet at the peak of the Roof Rafters as shown in Image 14, and attach using 2-1/2-inch screws (Image 2).
Cut the roof felt to fit, making sure the pieces overlap across the roof sheathing, and attach to the roof sheathing using either roofing nails or galvanized staples. Attach shingles to the roof using roofing nails and roofing cement as needed.
Create ridge shingles from cutoff shingle tabs and apply using roofing nails and roofing cement as needed. If you are unfamiliar with installing shingles, check out our guide here (Image 3).
STEP 13
Add the Pergola Rafters
Use the cutting diagram as a guide for the parts in this section of the instructions (Image 1).
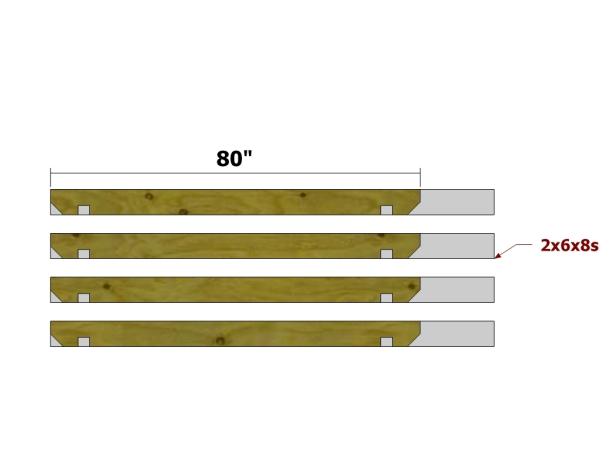
Use the layout as a guide for cutting the Pergola Rafters (Image 2).
Position the Pergola Rafters, adjust the rafters as needed until they are in the desired position (Image 3).
Attach them to the Side Top Rails using 4-inch screws to stabilize them. Drill countersunk pilot holes for the screws (Image 4).
STEP 14
Add the Final Touches
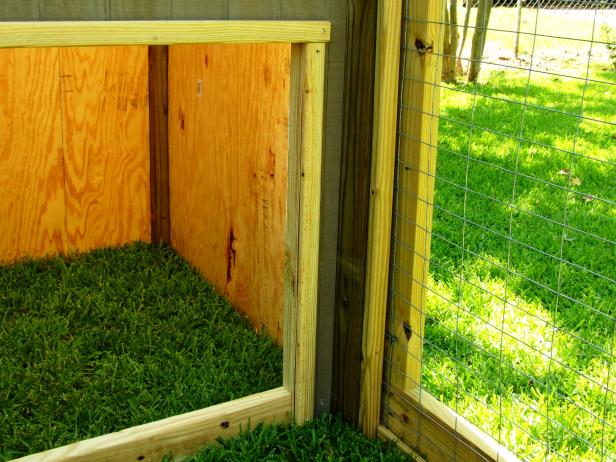
Apply silicone caulk to all seams where the siding meets the panel assemblies and where the Filler Strip meets the back Roof Rafter. Do a final check to make sure all cut wire fencing edges are covered and will not be exposed (Images 1-3).


















No comments:
Post a Comment